Shrinking a Partition in Windows Vista/2008
In the past, managing disk partitions had to be mostly done through 3rd-party tools such as Partition Magic and others, that had to be booted externally to Microsoft operating systems from bootable CDs such as Hiren's Boot CD (Note: This download is available from various sources, you'll need to Google it and find one.). Such tools allowed you to re-format your disk, manage partitions, and mostly to extend (increase the size of) and shrink (reduce the size of) disk partitions. Unlike in previous Microsoft operating systems, Windows Vista and Windows Server 2008 now allow for an easy, out-of-the-box, method of shrinking partitions and making them smaller, thus freeing disk space and allowing the creation of another partition out of that space. This is made possible by using the Shrink feature in Disk Management. If you have multiple partitions on your hard disk, you can delete and create partitions from the resulting unallocated space. When you delete a partition, all data on the partition will be erased. You can also repartition hard disks with a third-party partitioning program. Several third-party manufacturers offer programs that allow you to repartition your hard disk without erasing data, but that's a topic for a future article.
Note: Besides shrinking a volume or partition, in Vista and Windows Server 2008 you can also Extend a partition or volume without the need to reboot or use 3rd-Party tools.
1.First, like in most administrative tasks, you must be logged on as an Administrator.
2.In Windows Vista, go to Control Panel > System and Maintenance > Administrative Tools, or on the My Computer context menu. Select Computer Management. In Vista, if you are prompted for an administrator password or confirmation, type the password or provide confirmation.
3.In Windows Server 2008 you need to go to Server Manager, found in the Administrative Tools folder or on the My Computer context menu.
4.Next, scroll down till you get to the Storage section, and in it go to the Disk Management console.
5.Select the disk you want to shrink, for example Drive C.
Note: Shrinking any volume is fine as long as you make sure you leave enough space on the partition you are shrinking. For example, having a 40 GB system partition might seem too much at the beginning, but after a while you might find it to be less than optimal. You see, many applications such as Microsoft Office take tons of free space. So do Service Packs, hotfixes and other files. For a server running Windows Server 2008 this calculation might be different than on a workstation running Windows Vista, but in any case, make a mental note of this BEFORE shrinking your partitions.
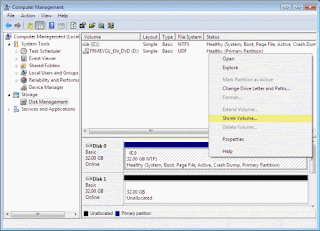
6.Right-click the disk and select Shrink Volume.
In Windows Server 2008 it looks like this:
7.Click Shrink to use the maximum allowable amount of space.
8.Windows Vista will do some calculations and tell you how much space can be freed. You can manually enter the amount of space you want to free by changing the "Enter the amount of space to shrink in MB" values. However note that you cannot enter a higher value than the value calculated by Vista.
9.After the shrinking process has ended you will see some unallocated space being available on the disk you've worked on.
Source From Petri.co.il
Thursday, December 4, 2008
How to Shrinking a Partition in Windows Vista/2008
Posted by Ultro Gen at 12:15 AM
Labels: Tips-Tricks
Subscribe to:
Post Comments (Atom)
0 comments:
Post a Comment